Halloween Art Projects!

    I LOVE the fall season the very best. Mostly because I LOVE Halloween, the decorations, the parties, the costumes…I love it all.  So the fall craft magazines when they come out are some of my favorites.  I have stacks of them I’ve saved over the years.  I’ve made so many different crafts over the years too.

Here are some that I think would be fun and easy and cheap for teachers to do in their classrooms. They don’t take a lot of materials, mostly paint and paper.  And some recycled things.
But hey, that’s good for the environment, right?

This Frankie craft is from Inspire Me Crafts


Milk Jug Ghost Halloween Decoration
These milk jug luninaries are from Family Fun
Jill Dubien always has some cute art ideas….


Halloween Gift Tags for free at Click Party HERE.


A link to a cute Halloween Bingo and Match Game is HERE.

I like to do a few weeks at Halloween of each of the different fun icons of Halloween and make up a day for each one and do some thematic fun and educational activities.  I do a ghost, pumpkin, witch, Frankenstein, bats and skeleton days.    Most days have a math game, a poem, a writing project, an art and some kind of word work too. Sometimes our math has an element of “witchiness or a Frankie or two….”

Then since I ALWAYS connect writing to whatever art we are doing we decided to do some Slogan poems
on Red Ribbon Week using these fun gravestones.  We all want to be drug free, that’s for sure.  Here are our funny SLOGANS FOR STAYING OFF DRUGS.  

Red Ribbon Week Activities

Staying Away from Drugs Slogans….

We added some Halloween punch outs to our Red Ribbon Week Gravestones….

The students had their choice of ACROSTIC PUMPKIN POEMS, or APOLOGY POEMS this month too. The apology poems turned out quite hilarious.  We saw apology poems on some teacher blogs and decided to try them. We read through about a dozen and the kids had lots of ideas.  The Acrostic poems are some I do every season. They are always great and easy to complete.

Halloween Apology Poetry….

So Funny! 

I read a few to them from another 2nd grade blog…..they got the idea….

Apology Poems sure were funny….

It was easy to do too once they had read a few examples….

HAPPY HALLOWEEN!  I found a link to a huge cache of Halloween poetry and songs. You can fine it at kidnkaboodle.

Funny Sayings…..

Time for a coffin break.

Have a beary scary Halloween
Gone haunting.  Will return at midnight.
I witch you a Happy Halloween
May our best witches go with you
Mummy’s little monster (under child’s picture)
You’re so boooo-tiful!


Remember the gh’oul times!
Time for a coffin break.
Have a beary scary Halloween
Gone haunting.  Will return at midnight.
I witch you a Happy Halloween
Trick or Treat! Give me something good to eat. Give me candy. Give me cake. Give me something sweet to take!
May our best witches go with you!  


Mrs. Moss’ 2nd Graders October 2011


Halloween Jokes and Mad Libs

Halloween Mad Libs are a great way to teach Nouns and Verbs in a fun way. 

I bought a Halloween Mad Libs book to help my students learn verbs, nouns, and adjectives and the differences between them.  I copied the story frames back to back with the lists of ideas for each of the categories of nouns and verbs. The kids then did a sloppy copy, I edited them for punctuation and spelling, and they rewrote them.

My Halloween costume this year….

Then they can choose a cute Halloween Stationery and print their funny story on it for everybody to share.  Here is a site that has lots of cute stationery HERE.

Halloween bat frame
Halloween Stationery  it is great for story writing….

I found a fun website for some Halloween Jokes and Sodoku activities to use at our Halloween Party next week. The link for jokes is HERE.

My “BUGS” and I…ladybug costumes…

Halloween Bingo is a great party game for kids! 

Halloween lunch box notes
Halloween Jokes

 The link for Sodoku is HERE  and HERE.  We always make and decorate bags to fill with “loot” as they go around to the 5 centers and play the games and fill their bags with trick or treat candy.One is a Candy Corn, One is a skeleton face, one is a Frankie, One is a Witch. They always turn out cute attached to a white bag with black and orange yarn or ribbons.

Colored Halloween Bingo Printable Game Cards
Halloween Bingo Game

A fun kids BINGO song with free downloadable text and pictures I found from Deanna Jump. The link for her free song is HERE.  Another one I found is HERE at Family Crafts.  Have a fun Halloween Party! I know we will! 

DRIED APPLE HEAD WITCHES

We are just about done with our DRIED APPLE WITCHES.  Here is Part 2 of the TUTORIAL on how to make them.

Here’s a good close up of the faces, we used wiggly eyes this year, and added 2 rice for teeth to the red marker smile….

Buy a bag of small apples, peel and dip in lemon juice. Push a clove into heads for each eye (OR add wiggly eyes after they are dried). After a week poke a 1 inch piece of toothpick for the nose.  Also push in a popsicle stick into the bottom of the head when it is kinda mushy and partially dried out. Dry under a desk lamp on paper towels or marinating tray for 2 1/2 to 3 weeks, rolling them over every day.

We had 3 colors of hair, rings, chenille stems and lots of different necklaces and fabrics….
Gavin and Peter’s witches….

Morgan and her mom’s witches and Matt’s witch…..

Our newest student Zach liked doing witches too! 

Saige and Nova….The kids LOVED MAKING THEM! 

They couldn’t wait to get their pictures taken with them…here’s Ty’s and Brynlin’s witches….

Then my lovely parents donated Halloween fabric. We need 1 square foot per student. Make a 1/2 inch slit in the middle of the square foot and place the popsicle stick & head through it. Then secure around the “neck” slit by winding the chenille stem around the stick AND neck fabric twice. Put a spider ring or bat ring on one of the arms made from the chenille stem.

Get a variety of 1 foot squares of Halloween Fabric….then let the kids choose theirs. 

Cut a 1/2 inch square slit right in the middle. 
Popsicle stick head slides right down into the slit in the fabric…then wrap a chenille stem around twice.
Notice my cute spider ring?

Next is making the witch broom and the witch hat. I had a lovely parent helper, Mrs. Kenner come in with a glue gun and helped me one day last week for an hour or so and one day this week again for an hour. We tag teamed the body and the head. Kids went from her station to mine. Here is how to do the hat and the broom.

The broom is from 1/3 of a wooden skewer with black crepe paper layered and  snipped
on the bottom and then tied around the skewer with black yarn.  Raffia works great too.

Mrs. Kenner helping us with our witches…THANKS SO MUCH! 

Here were the 2 shapes cut from black felt, cone and circle…roughly 4 inches each. 

Put a strip of hot glue down one of the 90 degree sides, then roll a cone…

Then glue the cone to the circle….It was pretty quick…I added a skinny triangle of material
to tops for a bow, topped with a yarn bow.
The black crepe paper was 2 1/2 inch squares layered, snipped & wrapped & tied on skewer pieces

Or you could use pieces of raffia 4  of the 5 inch pieces folded in half and tied on skewers….

Here I am tying the yarn around the crepe paper layers…

You can tell the kids are very proud of their witches! 

They all look a little different with hair color and material all chosen by the kids….

They also chose their arm color and “spider ring” colors and made their own necklaces out of
Oriental Trading Halloween beads  Link HERE to see and orange pony beads on string. 

I think the most popular hair color was green yarn, but they chose from purple and yellow too….
also the necklaces all turned out different… 

One hand is wrapped around the “rings” and the other around the brooms, but they are also glue gunned down to the front of the dress.  I also trimmed just a little triangle off the fronts of the dresses to round them out a little. The kids made the faces, added the wiggly eyes and I added 2 rice teeth to the smiles.

I think these Allie and Emma tried to make twin witch dolls? Don’t you think they succeeded? 

Probably the 3 most different looking apple head witch dolls in the class! 
Here’s how I did the hair…wrapping around my hand, then tie in the middle, then clip the round ends
& attach to top of apple with glue gun. Then hat over that….

I think this one was my favorite.apple head witch doll……so WITCHY LOOKING with those rice teeth!  

We’ve been singing “FLY FLY WITCHY” in music so I could hear kids singing it off and on while we were  making our witches while writing Halloween Puppet Shows (next post). I have read them most of these books for read alouds after lunch too. My favorite is Witch, Witch, Come to My Party! It has the most gorgeous full page art of any book I’ve ever seen! The kids gasped in awe as I turned the pages. Just look at the cover to get an idea!

Fun Witch Books to get us thinking about our puppet shows we are writing….Characters, Settings, Problems and Solutions…

More Witchy Literature books….and Here’s my sample witches, past and present….

 Hope you loved seeing our witches as much as we’ve loved making them! Happy Halloween!

Apple Head Witch Dolls

We have a cool apple tree in our backyard. And every Halloween I pick a few dozen apples so my students can make dried apple head witches! Here is one from last year’s class.  This year’s heads are still drying out. 
Dried Apple Head Witch Craft

Here is the FIRST INSTALLMENT of my TUTORIAL ON APPLE HEAD WITCH DOLLS. My 2nd graders are making them this week. The trick is to peel your apples and then dip them in lemon juice, or else they will grow mold before they dry out!

Dried Apples peeled and dipped in lemon juice

I always get a lovely parent to peel the apples. This year Morgan’s mom Mrs. Kenner did them for us on a little apple peeler. I’m sure it was time consuming. Thank you SO MUCH Mrs. Kenner!

I got all of these apples from my tree, which is abounding in apples this year! I get like 3 peaches and 5 apricots and 6 nectarines, but I get a gazillion apples! So it’s a fun thing to do for Halloween, dried apple witches!

You can see they are already starting to pucker and dry out!

The body is made from a popsicle stick pushed into the apple. The dress is just a 1 square foot of material rolled around the popsicle stick in a cone, or you could put a small slit in the middle of the square and slide the popsicle stick through the slit. Then I use an orange chennille stem wrapped around the “neck” of the popsicle stick OVER the material and the ends are curled into small loops for hands. Wrap the broom around one of the hands.

 Sometimes I put a plastic “ring” on one of the hands. I have found spider or skeleton rings at the dollar store. The necklace is made from a candy corn shaped foam bead. I got a mega set from Oriental Trading LINK HERE that has lasted for like 5 years worth of my classes.  Every year everybody makes a Halloween necklace with the beads.

Fly Fly Witchy Witchy Fly!  Freaky dried apple witch.  

 I usually make the witch’s broom out of raffia and a 1/3rd piece of a wooden skewer (I got a package from the dollar store). This year I made black ones out of black crepe paper cut into 3 inch squares layered into 3 squares, and I used scissors to cut the broom “fringe”. Then I wrapped black yarn around the top and tied the 3 inch squares with a piece of skewer inside for the broom handle.

 You can gouge out a 3 little impressions in the face before it hardens for 2 eyes and a mouth.  But this year we didn’t and they still look good. They eyes can be made with  cloves or glue gun some wiggly eyes like we did this year. The mouth has a few pieces of rice glue gunned on after using a red marker for a smile, and the nose is the pointy end of a skewer piece or you could use toothpicks….just break off an inch piece and push it it. Have the kids use green and make a “wart” on the nose from a marker. The mouth and eyebrows the kids do out of red and black marker.

I’ll GET you my pretty and your little dog too! 

Here’s a close up of my witch sample from last year.  The hat we made with black felt using just a circle cut out and then the pointy part was just a cone shape. We glue gunned the 2 pieces together and then used a wacky green yarn I found at the craft store for the hair. This year I bought purple and yellow yard for hair too. I’ll post more pictures when we actually put together our witches next week.  Those shrunken heads should be ready soon. :O

Field Trip!

We had so much fun on our field trip….and learned A LOT! 

Learning from a geologist….

Learning how to pan for gold….

This was as much fun to watch as it was to do! 

We got to take home a bag of rocks with a match quiz

panning for gold was fun! 

Learning from the paleontologists….

Saige in a dinosaur footprint! 
Being taught by a real geologist….

More rocks ….

They looked through microscopes, had black lights tests on rocks…acid tests on rocks too…

They had to guess what type of rocks these were….

Looking at hardness levels of rocks…diamond is last of course. 

She was showing an acid tests on rocks…

Close up of the panning for gold tanks….I think this was the kids’ favorite! 

Lots of dinosaur bones…real ones and plaster castes that were painted…

She was showing the kids all types of fossils….

This was the EROSION lesson…super cool! 

They loved watching this bridge capsize when the hose rained down too hard! 

Andrew got quite a catch of rocks panning for jewels and gold! 
Close up of the minerals they got to keep and take home from panning for gold.

He tested us on the 3 types of rocks….it was hard! 

Lots of fossils everywhere…..He Mrs. Moss has one like this in our classroom! 

So many cool exhibits and things to touch, horns, teeth, jawbones…

Each area was hands on and had things to discover and read….

Then we had lunch at a fun park here in Sandy.  What a great day. The best part was they gave each student a bag of 12 rocks and a page describing each rock to try and match up definitions and colors. How did you do on your little match quiz?   All the teachers were given a Rock Poster too! So cool of them!  We had a great day at the Utah Geological Survey. Thanks for doing Earth Week once a year.

Bony Skeletons “Crack” Me UP!

Candy corn and skeleton Art

We’ve been working on some cool art projects for our Halloween Bulletin Board.  We did some tissue paper CANDY CORN.  The kids designed their own piece of corn, then I cut out 2 inch squares of tissue paper in yellow, orange and white. Then they twisted them on their pencil eraser tops and glued them down in rows. They turn out fluffy and pretty.

Woven Skeletons 

Then our whole 2nd grade makes these cute SKELETONS.  We finished the candy corn last week and finished the Skeletons this week during art.  So Here’s how to do the skeletons.

Cut 1 x 18 strips of black and white 8 of each color for each child. Then glue 2 whites together at the ends and 2 blacks together at the ends to make 4 long of each color. Then glue the white top edge to the black top edge at a 90 degree angle, like the picture below.

 Then comes the fun part. Cross the white over the black in front, then the black over the white turning it a little as you go. It will always look like an L.   Some kids crossed it behind and some kids crossed it in front. It doesn’t matter as long as you are consistent.  It was pretty easy for them, they got into a rythm.  When they got to the end of the strips they glued the last 2 bits together.  Each of these make an arm or a leg.

Weaving the arms and legs for the paper skeleton….

We did a fun science matching the bone names to the picture of the skeleton parts of the body. It was fun!

Then they made the body with 18 x 2 1/2 inch strips, just 1 white and 1 black. You can see some kids doubled it and their body (belly section) is longer. We all decided the shorter looks better.  Lastly we cut out heads, hands and feet that we had copied and glued them to the body. We added a brad to the head and connected it to the body so it could swivel around. Kids loved that part, as you can imagine.

Here’s our finished Candy Corn Art

We put the skeletons in all kinds of poses….

 So here are our finished skeletons.  We then learned about some of the bones in our skeletons and did a matching activity, and read a book on Skeletons.  I also put together a take home bookbag for home reading called “THE SKELETON BAG” with 3 books inside on our skeletons, our bones and a book of Xrays of our bones. There is also some fun glow in the dark skeletons and some fun activity pages in a folder to do.

They look so funny on the bulletin board….One of their heads fell off today…. those bony bodies “crack” me up! 

Then we wrote mini reports.   I read them a non-fiction book on spiders and we wrote reports on spider stationary. I had collected 2 Weekly Readers and 1 Scholastic News on Spiders. We read all of them, then brainstormed facts about spiders on the board. Here’s our finished reports.  They turned out great.

Then we wrote mini reports on Spiders…..

Ty’s report on Spiders

Flint’s was a great report…..

Andrew did a good job too! 

Lots of cool spider facts…..

Great Job guys! 

Gavin’s report…..

Allie’s report….

Our finished Halloween Bulletin Board….

 Hope you love Halloween like I do…. The knee bone’s connected to the….leg bone….doo-dee-dah…..

Kids Learning Keyboarding

We were cleaning out our garage and storage room for a trip to the thrift store to drop of some of our old junk. We happen to come across John’s old low tech college typewriter in the suitcase. Our grandkids happen to be spending the night and they didn’t know what in the heck this old dinosaur, piece of machinery was!   
This is how I learned to keyboard…..typing on an old Royal typewriter…age 16

It is so amazing that my  little 2 year old granddaughter in the picture below can play on an Ipad better than either of her grandparents combined. But I can type 90 words a minute on this old machine! (Oh yeah, I’ve got skills!)

 I learned to type in high school many years ago on one even less streamlined than this one. It was the noisiest class you can imagine! They would play a cassette tape really loud over the speaker system and it would tell us what keys to type in succession to a rythmic beat.  There were probably 50 kids typing in that class.  Such a ruckus we all made!

Here’s my granddaugter Megan, age 3….she is a wizard playing games and learning programs on the Ipad.

Now kids are learning keyboarding as young as 5  in schools using  portable mac laptops, alpha smarts and the other minis. It is amazing the technology out there and how fast it can change. When I watch kids changing the font, the color of text and highlighting and deleting their text so quickly, skills that took a long time to learn in computer classes years ago, I’m always surprised by the things kids “pick up” on their own without any training. None of them are afraid to go poking around to see what this thing can do!

Now here we are, many years later, teaching computer keyboarding to young kids so they can master computer skills at an ever earlier age.  It is a new generation of little people who are not afraid to putter around with high tech machines.
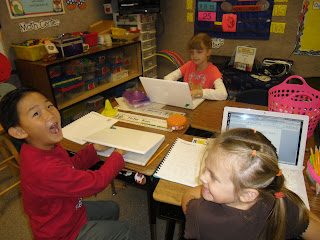
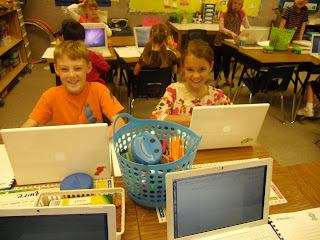
Keyboarding kids….

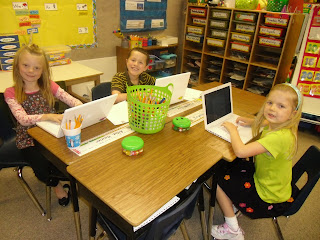
They are learning the home row….

  I was always afraid I would delete something when I first started word processing at age 21. I was a legal secretary with an Associates Degree in Secretarial Training from Ricks College. (Don’t laugh…I can almost hear you snickering now!)  and my patent-lawyer boss went from a Correcting Selectric model of typewriter to a Panasonic word processing typewriter. It made the job of a legal secretary soooooo much easier! You could actually type up the patent applications without white out or carbon paper. It was so easy to remedy mistakes. That was back in the late 70s. Yeah, I’m feeling old today!

Keyboard Chatter is the curriculum they are using….

  I used to have to type up patent applications from my boss’s scribbling on yellow legal pads. Then he’d make changes with a black felt tip to my 1st draft, and we’d go from there to many more typed drafts. After new technology invaded our law office, thanks to Panasonic,  I could go in and change just a few sentences here and there and reprint new copies super easily. It was the precurser machine to a computer. It had a tiny screen that only showed you 2 sentences of type, but you could back up whatever you had typed with ease too.  What a time saver it became.

I know they are learning new technology at exponential rates…

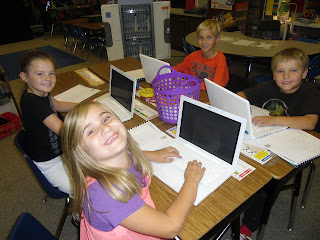
Learning Keyboarding at age 7….who would have thought?  

 When I left that job to go have my first baby, they replaced me with another Panasonic. Such is the speed of technology. I wonder how long before teachers will be replaced with computers? I don’t even think a decade will pass before teaching looks vastly different than it is today. We shall see.  In the meantime, look at what these kids can do with our mobile computer labs here at Sunrise!

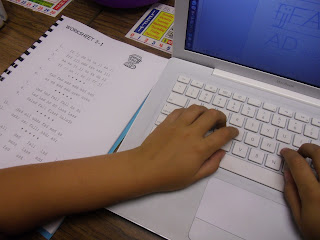
We’ll be typing up our stories very soon! 

Halloween Story Problems

We are learning the “key words” for addition and subtraction. I made up a pocket chart with the different words we have come across as we do our story problem for the day.

Here’s our cute Halloween Bulletin Board with our story problems under the cute art…..

I love these little ghosties flying around….

The kids got really good at making up their own. So we used some cute Halloween themed paper and started writing word problems using some of the characters seen on Halloween.

In this story the skeletons “sprout kitty wings!” So funny! 

Word Problems….mixing math and art….

 Then we had the kids take turn reading their story problems to the class. Everybody got out their whiteboards and tried to figure the problems.

We put some cute Halloween Scenes on top and made a cute bulletin board.  See more of them HERE on an earlier post.

They turned out really funny. Some are very challenging too. When we had at least 5 hands raised we picked somebody to tell the answers. If they were correct they got a gummy bear. Then they got to come up and read their problem. And on we went.

Halloween Story Problems

It was lots of fun. And everybody got a lot better at understanding the difference between IN ALL, HAVE LEFT, ALTOGETHER, HOW MANY MORE, AND TOTAL. YUP!

Halloween Art

HALLOWEEN SCENES IN MRS. MOSS’ CLASS

My favorite Halloween Scene in my living room at home….

We made a cute Halloween yard scene using white picket fences on black. We curled 1/4 inch strips x 5 inches into circle curls and then glued them sideways into pumpkin shapes.

Here’s our Halloween Bulletin Board….we wrote word problems underneath…..


 It was tedious for little fingers so we only worked on it for about 20 minutes each morning right before recess. We finished them in about 3 days.

 The Spiderwebs we cut out kind of like snowflakes. We got the template from Martha Stewart Crafts on a special Halloween decorating edition she did. I found it last summer when I was perusing craft websites like I do in the summer to plan for the next year’s art projects….(being an art minor I have an obsession kind of….snicker).  The link to her tutorial and template (just click on the word template in her first paragraph) is HERE at Martha Stewart Crafts.


 Then we made different moon shapes. Some made full moons, some shaped like bananas. Saige and Trace have some neato scenes too! 

Then we added black yarn spiders and glittery pom pom spiders with colorful wiggly eyes. It was kinda hard to glue the eyes on because of all the glittery tinsel sticking out of the pom poms, so I might not buy that type of pom pom again next year. 😀

Matt took a lot of time on his…it looks great too! 

I got my supplies from Joannes Crafts.  Wiggly eyes come in all sorts of colors, as do the pom poms.
The ones I had were glittery looking pom poms. Maybe next year I will use regular ones, without the tinsel spikes all over.

 Colorful wiggly eyes make those spiders POP! 

We used plain black yarn….I liked the longer spider arm lengths better than the shorter ones. Next time I’ll give kids maybe 5 inch lengths with 4 pieces each instead of the 3 1/2 inch lengths. Longer spider legs looked cooler I thought.

I loved Gavin’s spider…..longer yarn  length was a better look! 


Hi Addie! Yours is cool too! 

 There was a little frustration on having eyes fall off over and over before they finally stayed STUCK! It turned out really cute.  

Allie is proud of her scene….


My kiddos are really proud of their Halloween Scenes!  

Oh yeah….these turned out cool! What do ya think?