Reader’s Theatre
We had a lot of fun this week doing a Reader’s Theatre of Jack and the Beanstalk to go along with our plant unit. I found some puppets for each of the 3 pages of text using these coloring book pages found at HERE at Sparkle Boxes. Then we divide up the parts and have readers use their most expressive voices. This is the way I did it this year.
Another way I’ve done it some years is to have each child bring in an empty cereal box. Then I cut out a square out of one side of the box after school (to use as a puppet theatre stage). Then we put the characters on Popsicle sticks upside down. Students paint black poster paint on their cereal boxes or cover them with paper (or spray paint them with a can of black paint after school). As the readers theater is read the kids can act out the parts on their own individual puppet theater stages on their desks. It’s a lot of fun. (but a lot of work too!) A picture and link to how to make a puppet theater out of a cereal box is HERE at Toddler Crafts. Or another cute one that shows how to do the puppet on a stick is HERE at Flipflops and Applesauce. I can’t find my sample or I’d snap a pic of it. Another cool tutorial is
this website HERE 
PUPPET FACES
I blow up the characters large for a class puppet for some kids to act out the parts too. The link for character masks is HERE at Sparkle Box. You will need a color printer for the masks. I just put them on poster board and taped them to rulers to keep them sturdy. The kids LOVE doing these mini reader’s theatres. A link for a cute but long 4 page readers theatre is HERE from the Grandview Library.
There is also a crossword puzzle of Jack and the Beanstalk at this link from ABC teach. It was a fun activity for my kids to do after reading the story and acting out the reader’s theater. My students loved this activity and didn’t even need the word bank. 

SCIENCE
On Monday when we plant our seeds we will watch the time elapsed seeds growing into plants on one of the utube videos below. Then we are planting our seeds in recycled soup cans. You can use washed out soup cans from home, some washed out pint size milk cartons covered in paper, or make a terrarium out of liter or 2 liter bottles cut in half similar to the example picture below. I just use the spout for air hole and I cut out about 3 inches of the middle section of the bottle.


TERRARIUMS (using empty 2 liter bottles)
A really fun activity to teach seeds and plants is to make individual terrariums. A good step by step how to is found at this link to Teaching Tiny Tots HERE. I love how she used ivy. I’d like to use fast growing grass seeds or radish seeds so the students can see the roots and how they grow up into stems and then on the radish, leaves. Start by reading the book From Seed to Plant by Gail Gibbons. She is a master of children’s science books.
 2 Liter bottle terrarium instructions HERE
Another fun planting activity is doing “Sprout Houses” in a zip lock baggie. That’s what we are doing this year. I pass out Lima bean seeds that have been soaking overnight. Then I pass out wet cotton balls. A link to a fun lesson plan using Lima beans is HERE at A to Z Teacher Stuff. We use the Lima beans as our seeds for our sprout houses which are another kind of terrarium. Tape them up against a window for light. Watch what happens in a week! I really like the kids to plant radishes because they come up within about 2 to 3 weeks. I’ll post our sprout houses tomorrow.
 |
| Lima bean and cotton balls make up our Sprout Houses |
 |
| Some of my girls making their Sprout Houses” |
BOOKS
From Seed to Plant by Gail GibbonsFrog and Toad Together by Arnold LobelJock in the Beanstalk by Stephen Kellogg One of my favorite books that my own children loved was The Tiny Seed by Eric Carle. It goes through the plant cycle in a really fun way that kids will enjoy. ART PROJECTThen afterwards we make an art project using real sunflower seeds as the round middle part of a sunflower plant. I’ve done it with yellow hands traced and cut out around the circle of seeds, I’ve also used yellow paper petals, and I’ve used painted dots of yellow inside traced petals (pointillism) with Q tips dipped in yellow paint. I will post pictures of all of my samples. Each year I tweak it a little bit.


WORD SCRAMBLEAnother fun link to a plant and seed word scramble of plants and seeds vocabulary is HERE at ABC Teach. I would attach the word bank to the page so kids will have that to use which makes unscrambling a LOT easier! (My kids all told me it was “too easy” with the word bank. Oh well!  MUSIC (use percussion instruments) A Seed Needs (To the tune of “Ta-ra-ra Boom-de-ay” ) I see you are a seed,Tell me what DO you need?I need some soil to grow,And then the sun to glow,Water to make me wet,Air for my leaves to get,Space for my roots to spread,I’ll make your flower bed! by: Iram KhanI always look for a poem to put on the back of art to sing or read together for shared reading. This is a great one for the backs of our sunflower art projects or our veggie garden arrays. A fun MATH ACTIVITY designing a garden for Frog and Toad for their 24 plants can be found HERE . It is a math problem solving that is challenging and fun. I will give the kids a page of clip art plants to color with 4 of each plant and they will choose the number of plants to map out a garden “array”. The book is called Frog and Toad Together by Arnold Lobel. The chapter is called The Garden. I turned it into a lesson on “arrays” and multiplication. They lined their garden veggies up and multiplied the “rows” times the “columns” of veggies. Here are a few finished ones. Some did larger arrays and some just did 2 x 4. So it is a great lesson for differentiation with that open ended aspect to it. I also modeled one on the board and wrote in “column 1, column 2 and Row 1, Row 2 etc. So they could refer to mine. Everybody did it a little differently.
 |
| Allie’s vegetable garden array… |
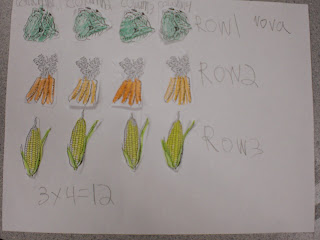 |
| Nova’s veggie garden array… |
 |
| Kate’s veggie garden array… |
Math: Attribute Seed SortAfter reading How a Seed Grows by Helene J. Jordan we will do a fun math activity. I buy a package of dried 7 bean soup mix (found in rice section of the grocery store). It is in a plastic bag. Give each table a Dixie cup full of the bean mix. Then give each table a construction paper Venn diagram drawn on it in black marker. The task is to use the Venn to place the seeds into 2 groups depending on what attribute the students decide as pairs or a table. (bumpy, smooth, black, spotted, oval, round, white etc.) It really helps to first do a brainstorm of all the words to describe the many beans and list them on the board. Have table captains write the 2 attributes on 3 x 5 cards and place at the top of each circle of the Venn. If they can then find one with both attributes to go in the center section they get a gummy bear each. Then have students walk around and see what other attributes the other tables decided on to give their Venn’s.
| 7 bean soup and venn diagrams..I add a few seeds, large peanuts, pods from outdoors….a great activity! |

 |
| Hi Girls! They are sorting their beans and seeds… |
 |
| Some wrote white and brown, others seeds and nuts, others big and little…. |
 |
| They added their own category titles on the yellow stickies… |
We’ve also do a few worksheets and a journal entry about our “Sprout Houses” and how our lima beans are doing in the wet cotton balls. We sorted out the ways SEEDS TAVEL as partners using this file folder activity page I made up. We read a few books on HOW SEEDS TRAVEL too. (wind, water, nature, people, animals). PLANT A RAINBOW!!! Veggies and flowers Another thing we do in this unit is plant some flower seeds in a clear cup or else from a small milk carton or recycled can. I have kids cover the can or milk cartons with cute scrapbook paper. A Fun plant tags can be found at this link HERE at Chart Jungle. Names can go on tags too with sharpie marker. I’ve had good luck with beans and radish plants. I’m a black thumb usually, so I go with what has a quick germination. Radishes are 3 weeks!!! 😀
 |
| I will post pics of finished cute cans with our plants… |
ART/SCIENCE MURAL So we end our unit by doing a mural. After reading Flower Garden by Eve Bunting, I give each child a small 5 x 5 piece of colored paper (flowers- use all colors), a long strip of green (stem), a 2 x 2 piece of black (seeds) and some green crepe paper 3 x 3 pieces (leaves), and a 4 x 4 piece of white (roots). I tell them they each have 4 jobs to do. They must take the papers and do a root, a leaf, a stem, a seed and a flower. (some years I delete the seed and pass out real seeds (pumpkin, sunflower, large ones that show up on the mural). Then I give them all about 5 or 6 minutes to cut out.
 |
| If you look close you can see a real seed or “bean” between the stem and root… |
Then I start the mural as soon as a few are done. I say,”If you have a cool looking root come on up!” If you have a cool looking stem, come on up!”and I have a glue bottle I put a few dots on each root, stem, etc. and we start to put the mural together. Kids glue down the parts of the plant on a blue piece of butcher paper with brown glued along 5 inches of the bottom for dirt. . Little by little the flowers will start out mixed up but will be finished as a flower collage. Nobody gets to put their whole flower together. And I don’t use all the kids flower parts. They put their root on some one’s seed, their flower on someones stem etc. Then I have the fast finishers take black sharpies and label the 4 parts of the plants on about 5 of the flowers across the mural. Some kids make a sun, some clouds, etc. It always looks fantastic. I label it PLANTING A RAINBOW. Of course we have to read the story too! It is such a beautifully illustrated book on planting a flower garden.
 |
| Here is a sample center activity I have along with 2 similar matching activities at the magnet center. |
PARTS OF A PLANT – MAGNET CENTER This idea was taken from a Red Butte Garden docent that came into my 2nd grade classroom and did this one year. I loved it and have used it ever since. I have the parts of a yellow sunflower plant I made up and laminated and put magnets on along with the labels that I place out at the magnet center. Kids love to put the flowers together and label them. The other center has pictures of parts of plants we eat and what type it is (root, leaf, flower/fruit, stem etc.) I hope you enjoyed my plant and seed unit. I will post our “plants” very soon. Happy Spring Planting!