Here are 89 great teacher blogs from first grade teachers. Man we are all crazy! Think of the hours we could spend shopping or reading instead of blogging! Oh well, we all love our jobs a lot. What more can I say?
sqworl First Grade Blogs 89 Blogs

Here are 89 great teacher blogs from first grade teachers. Man we are all crazy! Think of the hours we could spend shopping or reading instead of blogging! Oh well, we all love our jobs a lot. What more can I say?
sqworl First Grade Blogs 89 Blogs
 |
| Digital collage created with Smilebox |
Here’s some pictures of the last 2 weeks of school. We’ve had a lot of fun haven’t we? Have a Happy President’s Day Everybody! Have a fun holiday. Mrs. Moss
Nothing is more fun than telling the Legend of the Groundhog to a bunch of first graders. They are amazed that this little hairy rodent, correction……large hairy rodent is in charge of our weather! It’s hysterical to hear their conversations to each other about if he did or didn’t see his shadow and how that will affect the future. I had to talk them down, reminding them that a legend is not equivalent to science. But they think it IS all very scientific. I don’t know if they got it. At the very least they think groundhogs have some close family ties to Mother Nature!
 |
| Most of the kids predict an early Spring…I hope they’re right! |

We all started the day doing a groundhog play and making our “props” (i.e. cool, buck toothed rodent hats)
Everybody wanted to be the star of the show of course. Luckily Addie’s mom was my mother helper for the day and she had them just trade parts. Problem solved! Then we made our predictions and wrote them down. I told them the Groundhog is only accurate 80% of the time, he could still be wrong! So most of them went with his advice anyway…. You know kids and their animals…..:) Then we graphed our preditions on our giant class graph using little groundhog cutouts. Yup, Spring won out.
 |
| Ricky the Rodent….I mean….Gregory the Groundhog! |
Then we read all about the Legend of Groundhog’s Day. I forgot to show them the utube of Phil in Pennsylvania, but I’ll do that tomorrow. It’s fun to see the actual little guy popping out. I wonder how old that dude is by now… like 200? He always looks very well fed, like a little portly for a rodent!

 |
| The Legend lives on….. |
 |
| Today was a freezing day to go out and check out sun shadows! Ugh! But we did it anyways! |
Then we made some cute little pop up groundhog puppets with the groundhog’s “house” being a cut in half paper bag and the 2 predictions on either side. I found some cute songs that go along with spring is early, or 6 more weeks of winter so we attached those to the bag and got out our instruments and sang songs. Then I passed everybody out a tatoo for Groundhog’s Day. We just took those home to try them out.
 |
| Groovy tatoos of the groundhog. |
Then we wrote our predictions out. They were really cute. We will have to wait and see who is right and who is wrong. We talked about sun and shadows and how they are made.
I’m finished now with my teaching the whole first grade about space. The last lesson was on the power of the sun. We made little sunclocks and put a piece of red string around them. Then we went outside to check out the sun. It wasn’t as cold as yesterday thanks goodness, it was only about 20 degrees though. EEK! Super chilly. They also loved my little solar robot. We watched him walk around the playground. The kids would make a shadow over him and he would immediately stop. Then everybody would laugh. And they would hop out of the way so the sun could hit his solar cell and he’d start marching again.
 |
| I’m predicting I don’t last much longer in these single digit temperatures! Ugh! Bring on the sun Mr. Groundhog! |
I found these very cute cupcakes in a magazine and I so wanted to bake some and make these too! But I forgot to bake them the night before. It is really the fault of my favorite show. It happened to be on last night and I get really glued to the t.v. when it comes on. (The Good Wife on CBS at 9:00). Oh well, maybe next year….
 |
| Aren’t these just the cutest things? |
 |
| Not as cute as these girls! Their hats turned out so cute too… |
My kids really loved doing the fun Groundhog’s Day activities. I hope his prediction is right this year. I’m slowly beginning to tire of shoveling snow off my car. I’m missing the beaches of sunny California. And so I can hardly wait for an early Spring. Happy Groundhog’s Day!
 |
| Pop! Goes the Groundhog! |

My class loves to study other cultures. Being a teacher educated in one of the true melting pots of America, Long Beach, California, a large port city, I was taught how important it is for other cultures in your classroom to be represented in your read alouds, hero study, art projects and social studies units. So every year I like to introduce the students to Chinese New Year. It’s fun to ask the parents of several students to bring in cultural items from their home that will teach the students something about the Japanese, the Chinese or the Korean culture.
 |
| We’re all ready for the Chinese New Year parade |
 |
| Addie, Andrew, and Mrs. Kim, showing the Korean festival outfits. |
One of my Korean students is Andrew. And his mom is Mrs. Kim. She offered to come in and give the kids some realia of Asian culture. Mrs. Kim brought in some Korean games, festival outfits, Korean coin money, and some rice cakes (you boil them, they aren’t cakes at all, who knew?) She is one of my monthly mom helpers. We LOVE mom helpers in our class!


 |
| If you want the kids to cut straight lines, have them draw ruler lines one inch apart, good math lesson for learning inches! |
 |
| Open the folded part, wrap it around, then glue together, that’s it! Easy! We then glued a 1 inch white strip to top and to bottom edge. |
We wrote on the white strips some chinese numbers we had in our Weekly Reader. It was fun for the kids and now they all what a 1 and a 5 look like and how to say them in chinese! It was kinda cool!
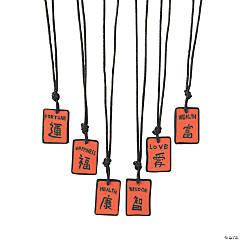
I saw these necklaces at Oriental Trading and thought we could do something like these using Modge Podge and some small tiles with holes screwed in them. I’ve seen these at art fairs where they have used scrabble pieces with pictures or letters Modge Podged on top. Kids would love these for Chinese New Year too.
  |
| Oriental Trading…a great place for crafty doo dads Check it out! I think this package is upside down, my bad!. But we used these symbols of chinese lfe on our pretty Chinese lanterns we made. Check them out in the photos below. |

 |
| Notice the black scrolling on the white strips…it’s numbers! |

 |
| Peter is showing his Tae Kwan Do outfit and some Korean games… |
 |
| Our classroom ceiling decked out with our handmade Chinese lanterns… |
 |
| Another really wonderful children’s book. I read to the class during Chinese New Year celebration week. Check it out below. |
 |
| The Chinese kids are showing their “leisees” with Lucky Money. |
 |
| Our colorful Chinese New Year masks! I bet you wanna come to the parade now, right? |
 |
| Gung Hay Fat Choy! Happy Chinese New Year! |
We went TOTALLY Polar last week and did some Polar Bear Watercolors. I found this neat link to a teacher who teaches art in an elementary school. She had a beautiful website that I just loved. So since I have a document camera in my class I can shoot anything from my computer up on the wall, pull-down screen. So I showed the kids some of her finished products with 1st and 2nd graders and showed them how she only used a few colors to do a fabulous evening snowy scene in an arctic habitat. (This would have looked a lot better on watercolor paper but I’m saving mine for the spring to do flowers on a picket fence, the paper is so expensive I can’t get a class set for every project!)
 |
| I love this one, this little guy is only 5! Cute Polar Bear Watercolors |
The link for her wonderful work is HERE. It is called That Artist Woman. She is very talented. Anyway I scrolled up and down and we looked at how she did it. Then I gave the kids 2 pieces of regular white construction paper 9 x 11 and we just dove right in. I sprayed their papers with a spray bottle to get them kind of moist. Then I went around spraying their watercolors and gave each pair of kids a paper cup of water and a paper towel to share and paintbrushes. And we just started with blue at the bottom and made a “hill” for the animals to roam around. Then we added a little orange and yellow for sunset. Some of the kids added a little red too. Very watery I told them, very see through. Then we finished with purple across the top, like a real purply sunset. The one thing we did was I cut them all out a moon circle to lay over their work before they began. I think next time I would put a little piece of tape under it because for most of them it moved around too much and they lost the moon image. I shoulda thought of that!
Then we read some books about Polar Bears and I had copied a sheet of facts from the Magic Treehouse Series Polar Bears at . We looked at a Weekly Reader on Polar Animals and read and discussed it too.
Then we did a Polar Bear Crossword Puzzle. The link for it isHERE It is from A to Z Teacher Stuff. I list the answers on the board for them to choose from as a word bank.
 |
| Winter Watercolor Scenes and Acrostic Poetry |
Then I found a clip art page of arctic animals outlines of a polar bear, snowy owl, snowshoe hare, hedgehog, etc. When their polar bear watercolors dried, or while they dried we cut out the shapes they decided to use in their snow scenes. My only direction really was just choose no more than 3 per picture. Then when their pictures were dried we glued on the animals we chose onto the 2 pictures. I told them that I would put one, their favorite, up on the outside bulletin board. The other one could go home. The papers start to curl up when they dry so I had them put their fat, heavy literature books on them while we went to recess. So here is our finished products. They turned out pretty, I think.
 |
| Winter Acrostic Poetry…Good job kids! |
 |
| Polar Bear Watercolors…so pretty! |
The acrostic poems we did are all about winter. We brainstormed winter words for W…then I….N….etc and put them all across the front whiteboard. I couldn’t believe how good they were in coming up with creative words! Well, except one of them came up with Elephant for the E. I said, “Now when have you seen an elephant walking around in the winter in Utah…hmmm?” They thought that was funny and we all laughed. So we nixed that word.
 |
| Winter Acrostic Poetry |

Then they had to use the word in a sentence or phrase on each line. We did them on sloppy-copy, lined paper first, then I edited them for spelling, then we rewrote them on the nice white final-copy paper. We
colored the little doo dads on the side with crayon. And I backed them with blue or purple paper for a border. We read some winter books about polar bears, Hedgie the Hedgehog, The Mitten (which names lots of winter animals) while they finished their cutting and pasting. It was a fun afternoon.
Don’t you wish you had my job? Teaching is the best job on earth.
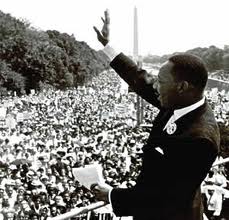
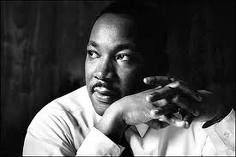
One of our great American heros who has his own national holiday on Monday is Martin Luther King, Jr. Every year I read the kids in my classroom a non-fiction big book . It has pictures depicting the civil rights movement in black and white photos, taken during the time of King’s peaceful protest era.
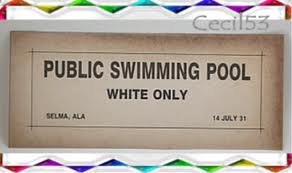
It is always amazing to me that the kids are shocked by the unfairness they see in actual primary source photos of the time. When I show them the pictures of “colored bathroom only” signs in the book, or the “blacks sit to the back of the bus” signs, and I ask them, “Do you guys think this is fair?” they always will unitedly chorus in the negative.
| Rosa Parks being arrested and fingerprinted for not giving up her seat on the bus to a white man |
The book has pictures of the police using firehoses or dogs on people they think are “out of order” and women shouting at black kids entering the first southern desegregated schools. Nobody in my first grade class thinks these things are right. It still amazes me that adults of that time thought they were.

So I think this little bit of history is important to share. To get kids as young as six thinking about ways to protest things they don’t like, in a peaceful, yet effective way is a good thing. Especially in this era of lawsuits and bullying, and crazy violence. For kids to see that there are lots of things in this world, run by adults, that still are not fair is important, in my opinion. And to show them that one calm, but focused voice, can help create change. And even kids as young as six can see the differences between things right and things wrong.

So we do a portrait of Dr. King and put it on the bulletin board along with writing projects by the students about what their “dreams” for the world would be. It’s always funny to see things like: “I dream that there will be no more bad guys”….and stuff like that. But it’s good to get kids to synthesize what they learn in a new way. So I do it for that reason. Hey, world peace isn’t just for the Miss America Pageant you know!
These portraits always turn out really resembling Dr. King. The key is to model each and every step and explain as you go. Some of them turn out a little comical, like a Mr. Potato Head, but others are really artistic and well done. I can always spot my budding artists by January of each new year.
 |
| We memorize this poem and recite it in pairs at week’s end |
 |
| Here are some of our “Dreams for the World” |
 |
| Cute pictures too…. |
 |
| They all did a really great job, don’t you think? |
When we are about done, I ask the kids to print at the top in Blue or Black crayon or marker: Dr. Martin Luther King, Jr. (I have to teach them what Jr. means, they always want to know). Then we draw a little American flag on a pole on one side of him, and a few little fireworks on the other side. I teach them to do the fireworks just starting with an X and then adding a few, longer criss crosses to the x. I do them in red and blue. Sometimes we will do the fireworks with red and blue glitter glue.
It ends up looking like this! Super cute kid’s art. Some years we do speech bubbles on white paper and I post the best 5 or 6 of them around the portraits. Then underneath we add our “Dream for the World”. It always turns out to be a nice, patriotic bulletin board for late January going into President’s Day in early February.
Happy Birthday Dr. King! And thanks for making our world a better place, and for teaching us how one voice can change the world.

My very favorite children’s book is called Tacky the Penguin by Helen Lester. She is a wonderful children’s author. Check her books out HERE The story is all about a comical, odd bird who does not conform and doesn’t fit in. (hmmm…maybe I feel a kinship to this bird, ya think?) I love books like this because of course, by the end of the story, all those who didn’t really like Tacky, grow to love him when he saves the day. The author has written a slug of similar books starring Tacky, and he cracks me up in every single one. It teaches kids a lesson too: that just because somebody is different doesn’t mean they don’t have a lot to offer. (yeah, all of us oddballs have something to offer!)
 |
| My Favorite Children’s Book Author. I want to be just like her someday….HELEN LESTER |
So we start by reading and laughing at Tacky and all his antics in several books. Tacky does odd things because he is an “odd” bird.” (It repeats this phrase throughout the story). We brainstorm other types of penguins like scientist penguins, doctor penguins and football star penguins, and I ask what kinds of things each would like to do? I take all their crazy ideas and we do a brainstorm on the board. For example, a rock star penguin might like to play guitar on stage and sing in a microphone. A football player penguin might like to tackle other penguins and throw football spirals, or make touchdowns in an icy stadium full of screaming penguin fans. This takes time and energy. But I may have a future Mark Twain or Hemmingway in my group, who knows?
 |
| Every day during Penguin Week we read a Weekly Reader, or Scholastic News, or a Science Spin and add facts to our “Waddle You Know” Penguin Facts Booklets. |
Then we use a story frame. It goes something like this: My penguin’s name is ____. He lives in a place called ____. He loves to _____. One day something awful happened…..Pretty basic. we write every day. It’s just like soccer….it just takes daily practice to get good.

I always ask them to add 2 describing words to their stories after they are done. Word choice is an important feature. We like $100 words like “fantastic” and “awesome” and “humungus” a lot better than $1 words like “good” and “nice”And our word wall is papered with $100 words the kids have come up with. So you don’t have to reinvent the wheel every writing. A cute art project using a toilet paper roll can be found HERE
We did the story frame and story illustrations over 2 days. I gave them a little sheet of black and white penguins to cut out similar to those above, and I always leave space at the top of paper for illustrating. So 1st two days were “sloppy copies” and illustrating the story.(So I’ve had time to edit them all after school!) 3rd day we started the tear art penguins and we write our final copies. This keeps the kids engaged with variety. We kept reading penguin stories, non fiction penguin books, and poems and songs along the way.
 |
| Yankee Doodle Tune to this goofy song… We love to sing in my classroom…people should SING MORE! |
For the penguins we tore little, 1 cm strips of white paper into a pile of “snowflakes bits”. Then we used a 9 x 9 inch square of dark blue construction paper and glued the little snowflake bits on the bottom of the page forming a small “hill” for penguins to stand on (or snowboard on….LOL ).

We then drew a black “potato” shape on black construction paper and tore around it. This was the body. Glue that on the hill. Then we tore a black round head and tore 2 “finger shaped” flippers. I punched out white holes from a hole puncher and went around each desk and dropped 2 holes for eyes. They glued those on their heads and used a sharpie fine point marker to make tiny black dots on the eyes. Then they tore 2 small, orange feet and cut out a yellow triangle beak.
 |
| I use this bulletin board to see where everybody is in the Writing Process…each student has his own car with velcro and they move them as they move through the process. |
 |
| The little cars and the road are just from border packs I bought at Lakeshore Learning. |
Lastly we tore white oval tummies shaped like smaller potatoes and glued them on. Most kids wanted to add some “snowflakes” coming down…with the leftover white bits, and some hats and scarves with leftover scraps. And then of course some added guitars, snowboards, microphones….gotta love it!
SOME CUTE SONGS WE SING TO PERCUSSION INSTRUMENTS:
 |
| Fun song we sing to the tune of I’m a Little Teapot |
 |
| Here’s Katy the Singer Penguin on stage…do you see the microphone? So cute! |
The stories they came up with are hysterical. My favorite is Katie the Singer Penguin! (I’m thinking she likes Katie Perry’s California Girls?) This is why we become teachers. Art imitating Life. Oh yeah!
 |
| Paper Bag puppets we do on white lunch bags from Costco We add this cute poem on the back and SING! |
Here’s our cute finished bulletin board. penguins on parade! Too bad I don’t love the cold like I love January projects….yeah…the snow is getting to me kinda…..Bring me my arctic parka P-P-P-L-E-A-S-E!
 |
| Notice some of the kids wrote “Head” and “K2” on their snowboards? I had to chuckle at that. We obviously have some little skiers and snowboarders here in good old UTAH! Swish…:() |

I love the crafts of January. In my classroom there is not enough January time to cover all the cute crafts I have in my filing cabinets. My favorites are Snowmen, of course. They have been done a gazillion different ways over the years. Last year we did this same craft only using white painted circles on light blue butcher paper. This year we tried something new, and I think they turned out really cute!

First we started with 3 different kinds of circles. I found this cute snowman head. It is a 5 inch circle.
The middle white construction paper circle is 6 inches and the bottom circle is 7 inches. Then I showed them how to fold them 3 times and cut out triangles on each side of their “cone” to make snowflakes.

Some kids added a pattern to their hat using 1/2 inch squares. Then they added a scarf to their snowman using a pattern of 1/2 inch squares. Then we added arms and “fingers” on either side of the arm. Cute!

Lastly, we used some paint stamps or foam stampers I got from Oriental Trading. If you want to check it out, go HERE They used white, washable poster paint in paper plates to stamp with and I just layed a little sheet of wet paper towel in each to kind of soak up the paint. Then they chose 3 different snowflakes to “paint” onto their picture. We sang some songs about snowmen, like the ones below.
 |
| Sing this cute song to Itsy Bitsy Spider! |
They turned out great. I’d have added some fine, white glitter to the painted snowflakes when they were wet if I had some at school. Next year I’ll remember to add that to the snowflakes! After we were done, we sang a few songs and read some poems. This one above is to the tune of Itsy Bitsy Spider
Then of course we had to do Snowman stories! We named our snowmen, talked about where they lived and what they liked to do for fun. We wrote “sloppy copies”, edited them, then rewrote them on nice, snowman paper. These kids are so talented. I really enjoyed reading their snowmen stories.
I like to give kids more help than just the word wall when we write so I have a monthly word bank. Here’s the one for January. And guess what? It’s a snowman! Go figure. It’s 18 degrees outside most days! EEK!

Adorable! Here is my cute bulletin board. Makes you want to pour a cup of hot cocoa, pull up an recliner chair, and “read the papers” NOW DOESN’T IT JUST?

 |
| GINGERBREAD TREES! YIPEE! |
Well this week is the last week before Christmas break and we are having our classroom Christmas party. I love to do fun Bingo games, make Christmas cards for parents, and decorate upside-down sugar cones to make a little tree scene on a paper plate. They are much easier to do than gingerbread houses out of graham crackers. The kids are more successful and they are easier for younger kids to do. I love to see the finished products too. They are colorful and delicious! and…there are no tears when somebody’s roof falls off! Yeah, and they are just as pretty as you can see!
 |
| More candy on the plate than on the tree…. |
Mix 5 drops of food coloring into the vanilla icing tubs and spread a walnut sized blob on each plate. Then you can place the cones upside down like a tree on the blob of icing to “glue” them to a plate. One of the other teachers glue guns them to the plate, but then what if they want to eat them later…YUK!
Then ice the trees rather heavily with green icing until no sugar cone shows through. Put a good, thick layer on or the candy won’t have “glue” to adhere to. Kids as young as 3 can do this, trust me, it is easy. Younger kids can have mom spread and then they decorate.
 |
| Thanks to all my parents for donating lots of tiny candies for decorating! |
I use a few of those veggie and dip sectioned off platters in plastic and fill each section with a different kind of candy. That way kids at tables can all share 1 platter and have lots of variety. This year somebody brought white chocolate chips. They looked real cute next to the skittles and red hots. 🙂
 |
| This year we got marshmallow snowmen instead of licorice peel aparts…CUTE! |
The kids get creative and add the candy however they want to on their Christmas trees! Some kids like to put a gumdrop on a blob of icing on the plate and add a tiny candy cane pushed into the gumdrop. Add a gingerbread man cookie to the plate or make a path of marshmallows or M&Ms around the tree. Anything goes.
 All Wrapped UP!
 When they are all done and have eaten half of the candy in the chip and dip containers put the plates inside a gallon size zip-lock baggie to go home. In case somebody’s drops theirs on the floor it will be protected on the bus ride or car ride home. They are cute left out as table decorations in the kitchen or on a shelf for Christmas. They always turn out lookin great!
 |
| Little Works of ART! |

We had fun making our parent gifts this week. We are doing white acrylic handprints on blue glass ball ornaments. The white handprints turn out to look like 5 little fat snowmen for the kids to then decorate with “painty” markers. Here is a sample that we just did today.


The kids love to do this craft and it always turns out so cute. They were pretty creative in their snowman making too, some of those hats were really wild!

The kids in my class then get a lesson in “giftwrapping” and we use school tissue paper and yarn and wrap these darling ornaments up for mom, topped of course by a wonderful handmade card.
This year I had the kids do a handprint card which turns out to look like Santa Claus. I paint their palm in peach paint and red and the fingers in white. Then when it dries I have them use their pointer finger and make white dots on the peach for the mustache and pom pom dots on the red hat and along the bottom of the hat too. Then we use glitter glue for eyes and nose (I do this after school and add a few glitter stars around the card) and we glue the saying…”All We Want for Christmas” to the front of each card.
 |
| We wrote letters to mom and dad….all the things we’d LOVE for Christmas! |
Then I give kids different types of cute stationery to write on and we go through the whole writing process doing a brainstorm of ideas on the board, then we write a “sloppy copy” on newsprint, and then I edit for spelling and we rewrite on the nice colored paper with these presents or gingerbread or other designs to color. It is basically a letter to parents instead of the letters to Santa. Here’s what they look like all done. Very nice writing activity with a little art sprinkled in! Hope mom’s love this!
